Lecture Notes
Panoramic Photography & Image VR
(By Tom Jackson and Brain Larkman)
Wednesday 20/02/08
· I am really interested in this topic and I would like to use it in our project this semester.
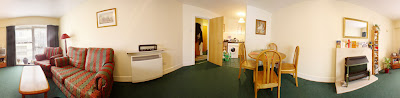
· An example of panoramic works.
· To create a panorama, you can use QuickTime Virtual Reality (QTVR) application.
· However, the first step is to take pictures either by using the tripod which ensures that the camera rotates around a fixed spot and that it stays level. It also makes it much easier to take longer exposures, which may be useful if you want to get a nice sharp picture with everything in focus.
· Or you can do it manually by hands. Try to hold your camera as still as you can, and try to keep your camera level. Take a picture and then turn to take the next picture, making sure that the next picture overlaps the first one by at least 25%.
· Do not rotate the camera while taking the shots, rotate yourself. Imagine the camera is on a tripod, so you keep the camera in the same place and you walk around the imaginary tripod (doing this reduces the effects of parallax).
· Take as many pictures as you like, and if you want to create a full 360 degree image, don't forget to make sure the last picture overlaps with the first one (the object in the centre in the previous shot, should be in the edge in the next shot).
· The camera should be in a portrait mode (vertical) and be careful with exposure.
· Try to use a wide angle lens which has advantages that
(i) you don't need to take a lot of pictures
(ii) you can capture more vertically so the picture doesn't look like a narrow 'slit'.
Creating Your QTVR Panorama
· After complete photographing, we transfer the pictures to VRWorx software
1. Create a new folder on your computer desktop and copy the pictures that you took for your panorama.
2. Launch VR Worx.
3. The Setup step of VR Worx will appear. Here you will need to tell VR Worx details about your pano shoot so it can accurately handle the pictures.Set the Max. Frames, Lens Params, and Image Size.
4. At the Acquire step you will see a circular layout indicating the positions of your pictures in your pano shoot.You will need to import your pictures into the VR Worx program by clicking on the "Multiple" button in the Commands section.
5. At the Stitch step, click on the "Stitch" button. The software will attempt to match details in the overlapping pictures and lay them out for the blend step.
6. Click on the "Blend" button to blend your stitched pictures into one seamless picture.
7. At the Compress step, the actual QTVR panorama is created using the video compression codec that you select.
8. At the Playback step you will be able to set different features of your panorama before exporting the QTVR movie.
9. Save the VR Worx document by selecting "Save" from the "File" menu.
10. Click on the Export Movie... button in the bottom left corner of the Playback step to export your QTVR movie.
We should then think out of the box, how to make it more interactive. Try to import the panorama you create into flash or director and have a go playing with it for example create a Virtual Tour which should combines multimedia contents with interactive authoring.
Additional reading and good recourses:
http://www.panoguide.com/
http://www.vrtoolbox.com/
http://www.edb.utexas.edu/teachnet/QTVR/Index.html#About
Panoramic Photography & Image VR
(By Tom Jackson and Brain Larkman)
Wednesday 20/02/08
· I am really interested in this topic and I would like to use it in our project this semester.
· An example of panoramic works.

· To create a panorama, you can use QuickTime Virtual Reality (QTVR) application.
· However, the first step is to take pictures either by using the tripod which ensures that the camera rotates around a fixed spot and that it stays level. It also makes it much easier to take longer exposures, which may be useful if you want to get a nice sharp picture with everything in focus.
· Or you can do it manually by hands. Try to hold your camera as still as you can, and try to keep your camera level. Take a picture and then turn to take the next picture, making sure that the next picture overlaps the first one by at least 25%.
· Do not rotate the camera while taking the shots, rotate yourself. Imagine the camera is on a tripod, so you keep the camera in the same place and you walk around the imaginary tripod (doing this reduces the effects of parallax).
· Take as many pictures as you like, and if you want to create a full 360 degree image, don't forget to make sure the last picture overlaps with the first one (the object in the centre in the previous shot, should be in the edge in the next shot).
· The camera should be in a portrait mode (vertical) and be careful with exposure.
· Try to use a wide angle lens which has advantages that
(i) you don't need to take a lot of pictures
(ii) you can capture more vertically so the picture doesn't look like a narrow 'slit'.
Creating Your QTVR Panorama
· After complete photographing, we transfer the pictures to VRWorx software
1. Create a new folder on your computer desktop and copy the pictures that you took for your panorama.
2. Launch VR Worx.
3. The Setup step of VR Worx will appear. Here you will need to tell VR Worx details about your pano shoot so it can accurately handle the pictures.Set the Max. Frames, Lens Params, and Image Size.
4. At the Acquire step you will see a circular layout indicating the positions of your pictures in your pano shoot.You will need to import your pictures into the VR Worx program by clicking on the "Multiple" button in the Commands section.
5. At the Stitch step, click on the "Stitch" button. The software will attempt to match details in the overlapping pictures and lay them out for the blend step.
6. Click on the "Blend" button to blend your stitched pictures into one seamless picture.
7. At the Compress step, the actual QTVR panorama is created using the video compression codec that you select.
8. At the Playback step you will be able to set different features of your panorama before exporting the QTVR movie.
9. Save the VR Worx document by selecting "Save" from the "File" menu.
10. Click on the Export Movie... button in the bottom left corner of the Playback step to export your QTVR movie.
We should then think out of the box, how to make it more interactive. Try to import the panorama you create into flash or director and have a go playing with it for example create a Virtual Tour which should combines multimedia contents with interactive authoring.
Additional reading and good recourses:
http://www.panoguide.com/
http://www.vrtoolbox.com/
http://www.edb.utexas.edu/teachnet/QTVR/Index.html#About


